So thought ide have a lil go at fixing the bike as weathers okish and on inspection of the pv its a rectangular shape not a diamond looks like its the right way round as the spot is on top but it just wont spin.
Just wondering before I start stripping it apart if anyone knows if there is a washer or pin stopping it on the older pre servo models? As its got the pulley in there and managed to source some cables but just cannot get it to move dont want to force it incase it breaks and would rather peoples knowledge as it might just be simple collar or something stopping it spin.
Cheers hope someone can help can post pics if needed as the bikes a bit guttless atm want to fault check one thing at a time
Should spin with your fingers when no pulley installed. Don't use excessive force. Chances are something isn't right. I'd say the older models would be pegged since to stop them rotating under load.
Thanks again Cal thats what I thought as its not the orig engine so not to sure on the year wondering if its a 97+ lump as it had the pulley in there and wasnt pegged or anything just wont shift was going to get busy and take a proper look but had to stop due to visitors might take exhaust off tomorrow and get to the other side of the valve see if anythings up in there just dont want to bust any O rings or anything expensive.
Will try to get some pics see if that helps if I get stuck :)
The O rings are completely inexpensive. As for damaging them that is highly unlikely. If they do break then you can be as sure as hell they were leaking gases anyway.
If I were you I'd take the powervalve out and have a look. Real simple job.
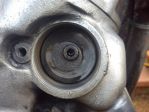
First go to the right hand side of the bike. On the cylinder wall there should be an oval shape cover with a bolt in it.
Carefully remove the bolt and carefully prise the cover out of place. If it hasn't been taking off in a while then it will be stiff and will take some WD40 and a light touch to remove. Breaking this part isn't the end all. You will just need to buy another one.
Once the cover is off you should notice that the powervalve has a bolt going through it. Basically the powervalve splits into two and one bit comes out each side. You'll need to undo this bolt and remove it from the powervalve. From inside the exhaust port you should be able to tap a small flat head screw driver into the seam and split the powervalve in half. Care is needed to not damage the locating dowels.
This will enable you to remove the right hand side of the powervalve.
Now if there is pulleys attached to the other side of the powervalve these will need to be removed and anything else from that side removed as well. This will enable you to remove the powervalve fully.
If it's gunked up with oil then use a blunt object to get the worst of it off. Polishing it will help stop build up of gunk in the future. Doing this basic maintenance will also improve gas flow out of the exhaust port and increasing efficiency.
What is the code on the side of your cylinder? It should be 3mb00. Also have a look at the cylinder head. Near the spark plug there should be another code. Again what is it. You want 3mb but it is common to find 3bn on this part.
Well took your advice took photo documentation aswell not sure of the best way to attach as dont want to use all the forums space.
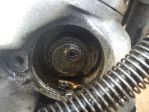
And as I thought can of worms the collar on the right hand side has broken looks a bit like a C now as half of it has snapped off no idea if there was supposed to be an O ring in there or anything.Managed to get all the valve out though and is carboned up gave it a quick clean as weathers still nasty and blowing everything all over put it all back together added some locktight to the main bolt then as I put end cap back on it snapped around the bolt fixture so I put a washer on to hold it together for now and the threads sheared :(
So now hoping it stays put and trying to look up what the collar should look like if it needs an O ring a new end cap and the price of it all wish me luck
-- Edited by DaMadOne on Wednesday 16th of October 2013 11:50:41 AM
Was hoping to have a look today sounds fairly easy little bit worried about the pins falling in the head but probly just me being paranoid. The codes are as you say I removed the left side with the pulley etc yesterday and it looked all good there was four small intendations around the securing collar I wasnt sure if a tool was needed to unscrew the valve and didnt want to force it out so left it be for now hoping I can get out today and examine/remove the right hand side to see whats going on.
Thanks again Cal will let you know how I get on your help is much appreciated
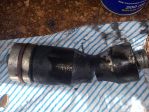
Got some more pics had it all out cleaned it up a bit enough to get it free needs a proper decoking will be easy as now I know how it all goes.
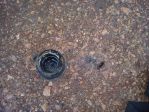
Its like the inside collar of the end plug the golden piece its broke its back side and sheared a bit off its front will see if i got a better pic looks like you get the whole lot if you buy new will attach some more pics.
Thought I took some of it all disassembled but can't seem to find them other side seems fine and now all works and spins freely just locked it in place with the servo for now so it stays open untill I can source a 3 wire version.
Its the actual brass bushing thiny if you look closely at the oily pic on the prev post I forgot to get a pic of it out seems to slot into the plug not sure if its supposed to have an O ring on it aswell as were no fragments in there still looking on the net for a pic of the bit that broke heres a pic of the state of the valve without its other bits which is the parts i ment to post doh but cant find any pics of them
-- Edited by DaMadOne on Wednesday 16th of October 2013 06:03:46 PM
-- Edited by DaMadOne on Wednesday 16th of October 2013 06:11:30 PM
-- Edited by DaMadOne on Wednesday 16th of October 2013 06:34:17 PM
Yeh made sure piston was in the way so nothing could fall in think I just need the end cap looks like it comes with both bits on aj sutton for about 30 bucks unless i can find one cheaper will have to wait for now.
Loom n servo came today loom looks like it will fit gonna dbl check the haynes in a bit servo also came is a 5 wire so wont run on my cdi but at least holds valve in place now and can adjust for how i want for now by hand.
Heres a pic of the broken bit if anyones got a spare giz a shout
looks like the right side of head pv ? is that a bit of the pv broken off that side not sure that will cause any problems but will see better when you take it out
Hhmm i'd be tempted to have. Look at how thT oil pump is set up. Looks to me like it is running over rich on oil. Better rich than lean but too rich can be just as bad as lean!
Yeh is on the list of things doesnt help that its been ragged round with exhaust half hanging off was caked in oil all over due to the leak just waiting on a helicoil to get it all sealed up as missing a stud atm. Might just bite the bullet get some gaskets and give it a proper strip down and rebuild over the winter would probly make more sense but as i'm not sensible who knows !!
Well at least i'm not short on things to do to her will keep me busy whatever I decide can't seem to source just the bushing collar bit so gonna have to order a new cap and get the hole helicoiled aswell. Have to keep the greenlaning on hold for a while or get the beasty ped out on the road can't grumble though as it all helps me learn how shes made and how to maintain would just be nice to be on the road.