DT125R ARCHIVE

Members Login
Username 
 
Password 
    Remember Me  
Post Info TOPIC: 1991 DT125r re build


DTR Senior Member

Status: Offline
Posts: 164
Date:
1991 DT125r re build
Permalink  


I thought i would start trying to dicument the rebuild of my 1991 DT125r.

I purchased it from a lady who had it sitting in a barn for 5 years doing nothing! I paid £400 for it and got a DT125LC thrown in for free! (although that was a real state and had vaious plant life growing on it confuse , so i sold it to my mate for £50)

Nearly finished stripping it down and cleaning up and re wrapping the wiring loom.

I thought a good place to start other than little odd jobs would be the engine and exhaust.

I have cleaned the engine up and re painted all the covers. The R/h cover was a pig to get off as you can see here-

http://dt125r.activeboard.com/t49903929/engine-strip-down-disaster-help-needed/

I am now in the process of putting the engine back together.

I have checked the bore with an internal bore micrometer that we use on aircraft at work and it is spot on standard measurements and in good condition, so am now waiting on a new piston and rings.

I have used stainless M6 bolts where i can this time as what were Yamaha thinking putting it together with pan head phillips screws?

I have used my angle grinder and wire brush fitment to clean up the exhaust.

The front expansion pipe looks great, so i have now sprayed that black. The rear pipe is pretty pitted so i am not sure what to do with that yet.

Only thing now left to strip down off of the frame is the rear swing arm link, once i figue out how it comes off as there is only a bolt one side? Then it will all be going off to powder coat and i need to come up with a colour scheme before then too!


I will try and find the pics of the bike before i took it to bits and post them up! but will keep adding as i go along.


-- Edited by zooankski on Sunday 8th of July 2012 08:56:15 PM

Attachments
__________________
DT125r project-here we go!


DTR Senior Member

Status: Offline
Posts: 164
Date:
Permalink  
 

I managed to get hold of some before pics. It doesnt look too bad (shame you can't see it close up!

Spent some more time on the bike today. Front and back brake calipers cleaned and painted which was an absolute pain to do!

I have also wire brushed the tank and now need to figure a way of getting all the rust on the inside out. Anyone got any cheap ideas?

I was also looking at the carb and i have noted it has a 130 main jet fitted??? does that sound right as 210 came to mindconfuse


Attachments
__________________
DT125r project-here we go!
NEV


Guru

Status: Offline
Posts: 2515
Date:
Permalink  
 

If the rust is bad inside your tank, there is a sealant you can use for coating the inside, it's called Petseal, you can get it on ebay here look.


http://compare.ebay.co.uk/like/200734783983?var=lv&ltyp=AllFixedPriceItemTypes&var=sbar&cbt=y


__________________


DTR Senior Member

Status: Offline
Posts: 372
Date:
Permalink  
 

It might work out cheaper and easier to just get a new tank

__________________

1999 Honda Hornet 600 - Current

1998 Yamaha DT 125 R - SOLD


Guru

Status: Offline
Posts: 767
Date:
Permalink  
 

depends how bad the rust is, but ive seen some people fill the tank with a few hand fulls of sand and gravel or a few nuts and bolts then wrap it in a towel and put it in the tumble dryer, look it up tho first if you do try it

__________________


DTR Senior Member

Status: Offline
Posts: 164
Date:
Permalink  
 

I might try and tumble it first and see what the result is confuse


__________________
DT125r project-here we go!


DTR Senior Member

Status: Offline
Posts: 154
Date:
Permalink  
 

Check out this guy for the tank

http://www.tankcareproducts.co.uk/index.htm


__________________


DTR Senior Member

Status: Offline
Posts: 164
Date:
Permalink  
 

Thought i would post a few before picswink


Attachments
__________________
DT125r project-here we go!


DTR Senior Member

Status: Offline
Posts: 164
Date:
Permalink  
 

Jobs done to date-

1/ Engine-new piston/rings, water pump seal, re paint and de grease, power valve removed (waiting new servo type), clutch adjusted, new gaskets, fresh oil

2/ brake calipers cleaned and re painted

3/ footpegs, stand and rear brake lever cleaned, repainted and baked at 200 degrees for 1.5 hours (stove enamel)

4/ carb cleaned, and float adjusted, (waiting on new jets)

5/ exhaust cleaned, wire brushed and re painted

6/ frame fully stripped and now at powder coaters together with swing arm

7/ switch gear cleaned and re painted

8/ clocks mounting braket wire brushed and painted

9/ radiator cleaned and re painted

10/ batt tray and air filter housing cleaned

11/ wiring loom cleaned and re wrapped

12/ Tank cleaned externally and wire brushed, given 2 coats of red oxide primer in prep for paint at a later stage

13/ various plastic panels stripped back to base plastic for re paint although will probably buy new

14/ front shocks cleaned and polished and oil / oil seals replaced

Not bad for a couple of weeks with a few hours here and there.


__________________
DT125r project-here we go!


Guru

Status: Offline
Posts: 7569
Date:
Permalink  
 

Looks pretty sweet :D

__________________

Always Originate, Never Pirate!

The Leviathan Project


Guru

Status: Offline
Posts: 1332
Date:
Permalink  
 

Yeeeaaaahhhh ,another older dtr love it ,you will not be disappointed,I'm running a 1990 h reg like yours it it can't be touched by any L-plater around lol, keep it coming fella nice one

__________________


DTR Senior Member

Status: Offline
Posts: 164
Date:
Permalink  
 

I got the frame and swing arm back from powder oat today-looks fantastic in white and silver. I also got my slinky glide kit for the swing arm bearing replacement but i cannot work it out! The kit has the needle bearings and a couple of bushes although these look nothing like the old ones which appeared to be copper? can anyone enlighten me as i appear to have a couple of these plastic type material bushes already (just got to remember where they came from!)

if you look at the pic on the A J Sutton website i think i need items 3 although the bushes i knocked out of the swingarm looked more like item 21 ?


Attachments
__________________
DT125r project-here we go!


DTR Senior Member

Status: Offline
Posts: 211
Date:
Permalink  
 

I just purchased a slinky glide but only got two needle rollers and two oil seals? how many parts did you get. If your going to be replacing your suspension linkage bearings/bushes, it just cost me £50 for everything (6 oil seals, 4 bushes and 2 bearings).

__________________


DTR Senior Member

Status: Offline
Posts: 164
Date:
Permalink  
 

Started rebuilding today, biggest issue was getting the collars inside the new needle bearings and bushes on the swing arm. Stuck them in the freezer at minus 20 for a couple of hours and pulled them in using a theaded bar eventually.

Pretty pleased with progress although i am waiting on 2 lower bushes for the swig arm (where the dog bones fit) and another load of stainless bolts!

I also got the wiring mostly installed this evening and it is looking good.

My son was after blue plastics but i am thinking it might look pretty cool in all white with some sort of graphics? May be spray the lower for legs white also?

Really chuffed with my mono shock lower rubber inside the spring and the shock over all. What ever used to be there had perished and then vanished so i made one by glueing 3 layers of rubber together and then putting it on a linishing machine to get the tapered shape.


-- Edited by zooankski on Thursday 2nd of August 2012 11:50:27 PM

Attachments
__________________
DT125r project-here we go!
NEV


Guru

Status: Offline
Posts: 2515
Date:
Permalink  
 

Looking very nice is that Zoo.

__________________


DTR Senior Member

Status: Offline
Posts: 164
Date:
Permalink  
 

Swing arm is silver G116, i just want to get on with it and it is soooooo frustrating having to wait for bits. Saying that, my bushes for the dog bone to swing arm link turned up this morning fro Fowlers (very fast delivery!) so i had fun getting that together earlier!

What i really need is my supply of M6 stainless bolts so i can replace everything!


-- Edited by zooankski on Friday 3rd of August 2012 02:42:35 PM

__________________
DT125r project-here we go!


Guru

Status: Offline
Posts: 1290
Date:
Permalink  
 

biggrin 
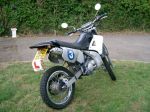
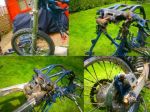
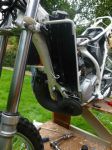
what colours the swing arm? gun metal grey?

looking good, hard to stop to wait for parts,


__________________


Guru

Status: Offline
Posts: 1290
Date:
Permalink  
 

sweet, i need some m6 allen bolts for my new engine, i replaced every bolt nut and washer on my bike. dont forget threadlock and put grease on threads depending on use


__________________


Guru

Status: Offline
Posts: 802
Date:
Permalink  
 

coming along very well that! love seeing dt's being rebuilt to showroom condition again smile


__________________

money killed everything....


DTR Senior Member

Status: Offline
Posts: 164
Date:
Permalink  
 

Hope to get her started tomorrow once i have re fitted the wheels so will be taking a load more pics! Any tips on a first start up? i was going to bleed the pump but run it on premix too for the first few starts (smokey but better than lean!)
Fingers crossed and i will keep you posted!

__________________
DT125r project-here we go!


DTR Senior Member

Status: Offline
Posts: 164
Date:
Permalink  
 

Got the wheels back on, topped up 2 stroke tank, added coolant and rigged up a funnel for fuel. Pre mixed a bit and poured it in. Ignition on and choke up, kicked it over and it will fire up but die after a few seconds. Choke off and it dies strait away.

Sounds like a lack of fuel but i am just not sure? Only thing missing is the air filter which i am waiting on although i expected it to at least run with it off.

I have checked the float heigh and adjusted it so the fuel in the drain pipe is level with the top of the float bowl but still no joy.

Posted a quick video to show what is going on. Any suggestions for me to look at?

I have removed the carb again and am going to give it a good blow through. Son was gutted but i told him that these things happen and at least it did fire up although only quickly, and that someone on here would have an idea of what is going on!

http://www.youtube.com/watch?v=Yqsn02uWwLI&feature=youtu.be

http://www.youtube.com/watch?v=oMk1N38NcLE&feature=youtu.be


-- Edited by zooankski on Monday 20th of August 2012 03:34:56 PM


-- Edited by zooankski on Monday 20th of August 2012 03:35:44 PM


-- Edited by zooankski on Monday 20th of August 2012 03:50:35 PM


-- Edited by zooankski on Monday 20th of August 2012 03:50:54 PM


-- Edited by zooankski on Monday 20th of August 2012 03:56:54 PM


-- Edited by zooankski on Monday 20th of August 2012 04:13:45 PM

Attachments
__________________
DT125r project-here we go!


Guru

Status: Offline
Posts: 1332
Date:
Permalink  
 

I would say blocked pilot jet ,...but before you go taking it apart again try tapping the carb a few times with a the handle of a screwdriver etc ,and then try starting it as th floats get stuck an can cause this to happen for a while till they settle in

__________________


DTR Senior Member

Status: Offline
Posts: 164
Date:
Permalink  
 

Blew through the jets and VOILA! it is going and will idle well. next step is putting it back together properly!


__________________
DT125r project-here we go!


Guru

Status: Offline
Posts: 1332
Date:
Permalink  
 

Nice to hear dude 
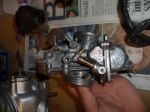
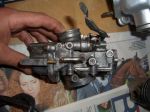
,but tell ur son about tappin th carb coz it can get stuck open aswel,saves him gettin stuk somewhere,with fuel pizzing out

__________________


Guru

Status: Offline
Posts: 1290
Date:
Permalink  
 

get photobucket mushwink


__________________


DTR Senior Member

Status: Offline
Posts: 164
Date:
Permalink  
 

Will do!

__________________
DT125r project-here we go!


DTR Senior Member

Status: Offline
Posts: 164
Date:
Permalink  


__________________
DT125r project-here we go!
MDK


DTR Legend

Status: Offline
Posts: 1690
Date:
Permalink  
 

looking nice .... how did you spray the spokes on wheels take them out or just mask all rim off ?

__________________

DTR125CO-1.jpg


de restrictions

good clean up of a old batterd  dtr  95


DTR Senior Member

Status: Offline
Posts: 164
Date:
Permalink  
 

The spoke nuts were not going to budge so rather than re lacing the wheel ( my son just wants it on the road! ) I rubbed them all down and masked off which took forever! Then 4 coats of hammerite smooth spray paint. They look good from about a foot away. I will either re lace or buy better condition wheels when the budget allows. Only bits we need now are a cylinder and head for the spare engine and some handle bar grips I think! Plastic and tank are still to be sprayed but wanted it running before we go spending out more of MY cash! Lol.

__________________
DT125r project-here we go!


DTR Senior Member

Status: Offline
Posts: 164
Date:
Permalink  
 

sounds the same with the cover fitted mate. I had it running and thought i would make sure the clutch worked so pulled the lever and put it in first. Bike stalled instantly and jutted forward so the clutch is not disengaging the drive from the gearbox. I tried tightening the cable as far as it would go and no joy (new cable too). the feel of the lever is as i would expect it though so no idea what is going on. The noise was not apparent last week when i started it up from memory so what would be the symptoms of the clutch lock nut coming off?
I have not taken it apart although it may have been previously. All i do know is the plates seemed free when the cover was off as i remember running my figer over them and there being slight movement.


-- Edited by zooankski on Tuesday 28th of August 2012 07:39:49 PM


-- Edited by zooankski on Tuesday 28th of August 2012 07:45:15 PM

__________________
DT125r project-here we go!
1 2 3  >  Last»  | Page of 3  sorted by
 
Quick Reply

Please log in to post quick replies.

Tweet this page Post to Digg Post to Del.icio.us


Create your own FREE Forum
Report Abuse
Powered by ActiveBoard